Archive for July, 2008
July 31, 2008 at 5:16 pm · Filed under Caravel project
I’m nearing the end … I have to be.
I really didn’t anticipate spending this much time on this project. Today was another 8+ hour day, cut short by rain at 4:45 p.m. That puts the total of my hours up to about 30-35, and Eleanor has probably put in about 16 additional hours. Why am I surprised? It’s a big job, even for a short 17-foot trailer.
 I soloed today. Eleanor wasn’t available for more than an hour due to things on her schedule. Fortunately at this point I’ve figured out how to set up large pieces for cutting by myself, so the need for someone to hold the end of the board was minimal. Despite working alone I managed to make pretty good progress: another closet door (a tricky job due to its length), a dinette end, a half-height bulkhead that goes next to the refrigerator, two sliding doors, two under-dinette doors, and several “mystery pieces.” That’s one of them in the photo, sitting next to the ratty old part it replaces.

I’m really glad we are rebuilding the entire interior. After spending a pile of money to have every other part of the trailer renovated, it just didn’t seem right to put the old interior back. I was considering it for economy’s sake, but never really was enthusiastic about the idea. Now that I’m deep into the guts of our cabinetry, I can see the water stains from ancient leaks, burn marks from a plumber’s torch, multiple stripped-out screw holes, and even a little rot here and there. Even though some parts of the cabinetry (such as the interior partition at right) won’t be visible to visitors, the smell of decay and the occasional crumbling of wood would have bugged me forever.
 At this point almost every piece is done except the two overhead compartments, and a few pieces of the interior that didn’t make it back to here. I’m going to store the overhead compartments and the remaining plywood to re-build them, and bring all the completed parts to Plattsburgh for re-installation. As I write this, the final two glue-ups are setting on the workbench. In the photo you can also see a large bulkhead off to the right. Every other completed part is loaded in the Armada.
Susanne called this morning with five stain recommendations, three from Cabot and two from Minwax. Her suggestion was to match the background color in the Marmoleum floor, which is a sort of subtle putty color. The floor’s primary color is yellow, but if we matched that color the interior could get overwhelming. We picked up three of the Cabot colors and I applied them to some scraps, then sprayed them with polyurethane for get a finished look. One was ruled out right away (“Coastal Gray”), and the other two are in consideration.
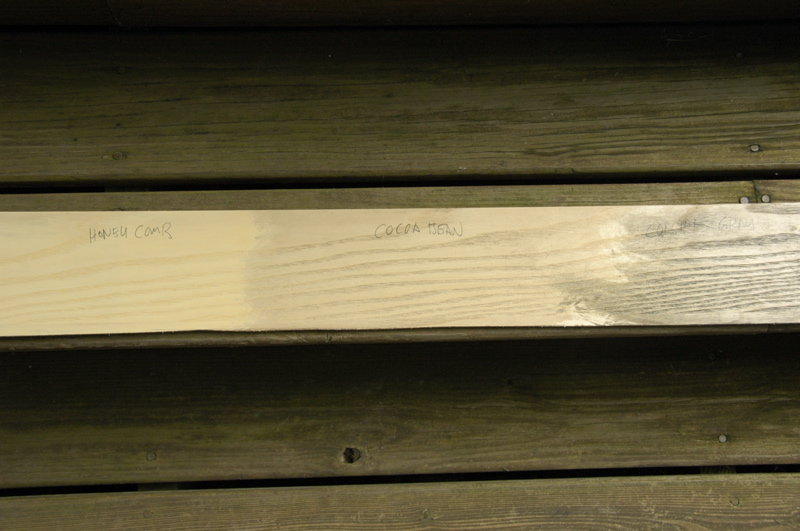
I suspect we’ll go with the middle one, which is called “Cocoa Bean.” It accomplishes our goal of evening out the look of the wood, without overpowering the interior. The “Honeycomb” on the left is not bad but in real life it appears rather loud. My preference is for a warmer tone than the Cocoa Bean, but anything warmer might clash with the floor. Susanne is a professional Interior Designer and I’ve seen several of her interior designs in trailers, and they are always beautiful and understated. So I trust her. Eleanor will review the colors tonight and hopefully we’ll make a choice, so we can begin staining on Friday.
July 30, 2008 at 10:05 pm · Filed under Caravel project
Amazing! Another mostly sunny day. That’s practically a record lately, so we took full advantage and spent it all working on the Caravel’s furniture. The “shop” is humming right along, although we lost a lot of time today waiting for glue to set.
Although yesterday I said we weren’t able to use glue, what I meant was that we can’t use glue on pieces that will need disassembly for shipping purposes. There have been at least a dozen places where glue has been indispensable, especially building the cabinet and closet doors. We managed to finish all the doors we started yesterday, including final trim and sanding. They look great.
Our technique of stacking all the doors in a pile and then weighting the pile down with paving stones worked very well, so we’ve been doing that all day instead of using clamps. With limited flat clean space to work on, the table in the Airstream had to be pressed into service too. That helped keep up the pace of production at our “furniture factory” (as my father calls it).
We also finalized the gaucho, then disassembled it and packed it in the Armada with the rest of the rapidly-growing pile of furniture. In between large cuts, I put together some of the many “miscellaneous” pieces, including two interior partitions for the kitchen, one interior partition for the gaucho, some blocks, and a couple of facias. There are still another half dozen or so miscellaneous pieces yet to go.
Eleanor tested the stain we bought, but it was a disappointment. We don’t have time to keep experimenting with stain, so I called Susanne Brown, the interior design expert and asked her to recommend a stain that would work with the color of Marmoleum floor we have. She’s working on it. Stain may become the bottleneck of this project, since we can’t put polyurethane on anything until we have the stain picked out and applied.
We aren’t going to build any of the interior shelving at this point. All of the shelving has been replaced by prior owners and no two pieces are the same. Instead, we’ll build shelving after everything else is installed, next summer. That will allow us to customize the interiors of the cabinets and closets to suit our needs.
A big pleasure of doing this project comes from being able to replace the old parts with new parts that are much better than the originals. I can take a little extra time and re-design a piece to have a nicer curve, fewer screws, smoother edges, tighter joints, or stronger supports. For me, that is a big reward and a motivator. Our trailer will be better than new, when we’re done.
One of the problems we are facing at the moment are the “mystery” pieces. We have an entire box of oddly-shaped wood parts that we can’t identify. They are so strangely designed and unfamiliar that it is hard to believe that they even came out of our trailer. Some of them are clearly shelves, which means we can ignore them, but others have pieces of finished elm on them, which means that they are visible somewhere in the trailer. We can’t ignore those.
The problem with those pieces is that in most cases they have obviously been re-worked by someone. That’s generally a bad thing, because re-worked parts tend to be — shall we say — “less than optimal.” They are shabby, riddled with mismatched screws, and have the distinct appearance of having been “fixed” in a big hurry.
If I knew what those parts were, I would know whether we should re-build them exactly as they appear, or design them more suitably for their function. But we are so far flummoxed by about ten strange parts. If I spend time rebuilding them and they turn out to be messed-up designs, that’s a lot of valuable time and wood wasted. Tomorrow I have to start on them if they are to get done at all, so some rapid decision-making will be done in the morning when I’ve got a fresh mind to consider the problem.
This is the first woodworking project I’ve taken on since we sold our house three years ago. As Eleanor and I worked on it today, little tricks I’d forgotten kept popping back into my mind. I remembered how to straighten a crooked board on the tablesaw, how to set up a straight line cut with a jigsaw, and a thousand other small tips that sped the work. I also popped the iPod into our new Atlantic Ego sound case, so we had tunes all day long too. (The nice thing about the Ego case is that it is dustproof and waterproof. It gets covered in sawdust, but at the end of the day I just rinse it off in the sink!)
Between motivation, memory, and music, the work moved along quickly. Now I’m starting to regret the impending end of this phase of the project. I’d like to keep going, and install all our handiwork in the Caravel right away. But with only a handful of days left, that’s impossible. We’ll put in just another day or two, before we hit the road again.
July 29, 2008 at 8:18 pm · Filed under Caravel project
We are making progress rebuilding the Caravel’s furniture. Today, being the only day this week without thunderstorms in the forecast, Eleanor and I decided to clear the decks of all other obligations and work exclusively on the Caravel project. I started around 8:30 a.m. and Eleanor joined me at 10, and we worked steadily through the day until 5:30 p.m.
 We managed to complete the other closet door, most of the gaucho, most of the major plywood pieces, and we rough cut most of the doors and drawer fronts. As we finish parts, they get stacked up in the Armada with the old parts for reference. (At right, old and new closet door frames.)
It’s encouraging that much progress has been made, but discouraging to see how much there is left to do. The entire morning was spent building the gaucho. This turned out to be the most challenging piece so far, because the gaucho has been hacked up by at least three previous owners. Only about half of its structure was original; the rest was a mish-mash of do-it-yourself “repairs”.
A fun part of this project has been studying how the furniture was built by the unnamed craftsmen in Jackson Center, Ohio, back in 1968. It’s not complicated, but it is mildly impressive by virtue of its simplicity, functionality, and light weight. The entire gaucho frame is about ten pounds. The frame was trimmed to a bare skeleton, but despite its parsimony it has managed to last for forty years in regular use.
At the time that our Caravel was built, Airstream had been making trailers for about 33 years (minus a hiatus caused by World War II). I suppose it’s not very surprising that they had figured out how to do it well by 1968. Even in the 1950s, when Wally Byam was still alive, he would harp on the furniture makers to trim ounces (“Ounces make pounds”) and make use of every inch of space.
With the gaucho in our trailer, however, a bevy of hacked modifications layered upon previous repairs resulted in a very confusing mix of construction styles. Each of three structural legs of the gaucho was constructed differently. One appeared to be original but had a giant L-bracket screwed onto it. Another seemed to have been stripped down and pieces were missing. The third was augmented by a horrible heavy subframe made of 3/4″ plywood.
We also added some challenges to the project, as a result of our joinery choices. The original design relied heavily on staples, which we don’t want to use if we can help it. No staples or glue can be used because we need to disassemble many of the parts for shipment. We’re using screws, which means some design modifications to the internal frames. So far we’ve used over 100 screws, each one hidden from view. We’re also taking the time to countersink every screw.
With the challenge of forensic study added to the task of building the thing, it ended up taking several hours of the day. We built about 90% of it, then set it aside to start cutting plywood. Tomorrow we’ll complete it, and then break it down to a set of four flat pieces plus connecting boards. Even unfinished, I have to say that it is a huge improvement over what was there. I’m fairly pleased at the results.
The budget has continued to rise. We’re up to about $900 so far, including everything. The “general purpose” blade in my table saw was not up to the task of making clean cuts in 1/4″ veneer plywood, so Eleanor and I went to the hardware store last night to get a better one. We also got some specialized blades for the jigsaw, a couple of additional pieces of pine, and some stain. We’ve decided that the look of the ash is a bit too “raw”, and are looking for some way to even out the appearance of it. We’ll do some stain tests shortly, to see if we can find one that gives it a nice mellow tone without getting too red or yellow.
 With the new blades in place, plywood cutting was fairly quick, but selecting each piece prior to cutting took some time. We cut a major bulkhead (wall), five doors, one dinette end, and one large interior partion for the gaucho. This took a bit of time just because of the task of wrestling 4×8 sheets of plywood, but also because each door requires two separate pieces. The doors need to be 1/2″ thick, whereas bulkheads and interior partitions are 1/4″ thick. Rather than buy 1/2″ and 1/4″ plywood and have more waste, we chose to duplicate what Wally’s guys did, and glue two 1/4″ sheets together to make the doors.
To complicate things, we decided to save money by using ash on the outside, and birch on the inside. The birch was about half the cost of the ash plywood. Each sheet has an “A” side with the best appearance, and a “B” side that gets glued. So for asymmetrical parts like the dinette end, we have to be careful to select properly oriented pieces that look good and make good use of the sheet. Even doors are a small challenge, because we need to orient the grain of the wood properly and avoid bad spots in the plywood. Once we’ve selected the section of wood we’re using, we rough cut them with the jigsaw or tablesaw about 1/2″ oversize, glue them together, and trim to finished size after the glue is set.
 Since we don’t have enough clamps for all the pieces we are gluing tonight, we just slathered the pieces with glue, stacked them on the workbench, and piled heavy paving stones on top. Hopefully this will give us a nice even attachment between the birch and ash pieces. We’ll find out tomorrow when we come back to trim them all to final size.
After a long day like this it’s hard to have perspective. It seems like we have more work left to do than we started with this morning. But when I tally it up, we’re actually doing quite well. Whether we finish by Friday is an open question right now, but if the weather is cooperative I think we just might.
July 27, 2008 at 8:35 pm · Filed under Caravel project, Home base
At long last Eleanor and I have found time to work on rebuilding the furniture for our 1968 Airstream Caravel. It’s awfully late to be starting this project, in the home stretch of our visit, but it’s now or never. All of the wood has been stacked in the shed for weeks, along with glue, fasteners, sandpaper, polyurethane, and all the tools we need. Our excuses for getting started this late are simply that we’ve been ridiculously busy on other things, and the relentless rain. But excuses don’t get the job done, and now the pressure is on.

A thunderstorm passes over Lake Champlain
On Saturday we got a break in the weather for half a day, so we got started on the project. Each piece of furniture in the trailer is to be recreated in new ash wood, duplicating almost exactly the original elm wood. With a light oak stain, the finished product would be nearly identical to the original in grain and color, but at this point I am leaning toward finishing with no stain, thus lightening the wood considerably from the original honey color. It should go better with the yellow/tan Marmoleum floor that is already installed in the trailer.
 Our workshop is a 20×10 tent structure with a blue tarp floor. The ground is sloped to one end, enough so that a loose pencil will roll off the table. Tomorrow I will have to try to level it up a bit more, but so far we’ve just dealt with it as-is. Rainwater leaks around the perimeter and pools on the edges of the tarp, so any good wood has to be kept off the ground to avoid water staining. The tent is infested with spiders, Daddy Long-legs, and flying insects of every description, so much that each piece of wood must be brushed clean of insect legs and wings before use. As a result of the rain-saturated ground, it is intensely humid in there, even with the door wide open. In short, it is far from an ideal wood shop, but it’s all we have.
 Getting started on a big project is always the hardest part. I did the first couple of hours alone, to get a sense of the process and the specific challenges. Then Eleanor joined in. Once we got past the first hour and both of us began to understand what we were doing, we began ticking along pretty nicely. She is specializing in drilling the joinery holes using the mini-Kreg, which involves careful clamping and adjusting. I mostly cut pieces to length and sand them smooth. Together, we manage the long rip cuts on the tablesaw and assemble the finished pieces.
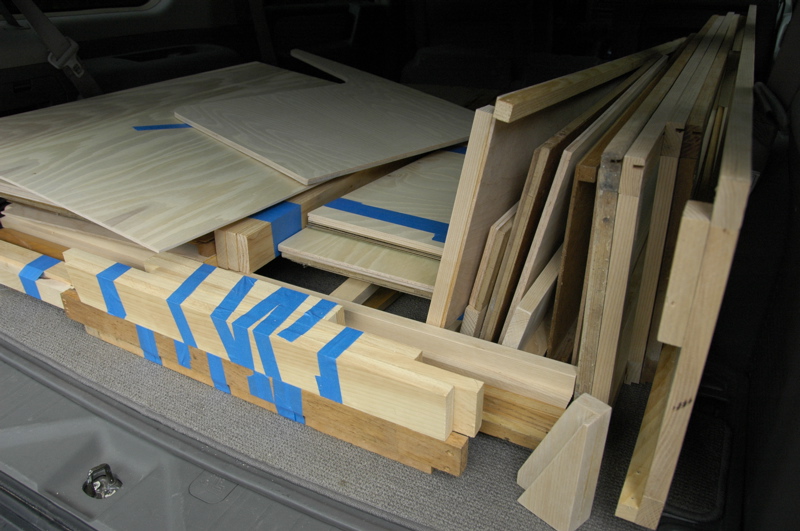
 The only really safe dry storage we have is in the Armada, so all finished pieces are going in there, with loose parts taped and the original pieces alongside for reference during re-assembly. We can’t fully assemble the furniture, because it has to go back to Plattsburgh in a compact format, so we’re assembling all the flat sections and labeling how they go together.
Today we put in another four hours before the heat of the day arrived. Progress has been reasonable. So far we have built the face frames for two closets, one side of the dinette, and the kitchen. We’ve still got another dinette side and the gaucho to go, plus two overhead cabinets, six cabinet doors, and a few simple bulkheads.
Whether we finish before we leave depends mostly on the weather. I’ve cleared some time in my work schedule this week, but if the thunderstorms continue it may not matter. I can’t use the tablesaw or chop saw when it’s raining (since they have to be set up outside the tent). In any case I’m not wild about building furniture in such humidity, since dry winter air will almost surely cause joints to open up. If conditions are really adverse, we can at least take some of the plywood down to the basement and start cutting it to shape with the jigsaw.
This weekend we’ve been visited by several friends from far away. Yesterday Abe and Melissa dropped by, visiting from Virginia. We just saw them a couple of weeks ago at the Vintage Trailer Jam, but they needed to come up to Vermont this weekend for somebody’s wedding so they popped by the house for a few minutes. Abe scored big points by bringing me a dozen maple donuts from a bakery in Waitsfield VT. He knows how to make himself welcome.
Today we had a sort of open house/beach party and invited several friends over. Among the guests were Felix and Patricia (with toddler Nicholas), who were the unnamed friends in a previous post from Tucson. Felix and I went to the same grade school in Vermont, and were by happenstance reunited last summer while we were both back in Vermont visiting. It turns out that he and Patricia now live in southern Arizona not far from our place, so we meet up at both ends of the country from time to time.
Splitting the time between work and fun is the only way to go. The Caravel project has the potential to be a nightmarish thing, but it should be a pleasant exercise if we handle it right. I actually do enjoy building things when I have time, and in the end there will be a lot of pride in having done it ourselves (and well), so if it comes down to rushing madly to complete the job or leaving it unfinished for next summer, we will leave it unfinished. At this point my goal is to get all the frames done, cut all the plywood pieces (so as to reduce them to manageable size), and deliver it to Colin up in Plattsburgh for winter storage. Finishing with polyurethane, hardware, final assembly, and fitting can be next summer’s project.
July 25, 2008 at 12:28 pm · Filed under Home base, Mobile technology
We’ve got only about a week left to our Vermont stop, and then we’ll be off again. We’ve been talking on and off about plans for the next year, but they have been rather loose. As usual, we’re mostly winging it. We know that we want to end up in Tucson sometime in October, and we’ve got stops in Denver and a few other cities. The details have been left vague until today.
For trip planning I find Google Maps to be extremely useful. You just click the “Get directions” link and then input the zip code or city/state of the start and end points. Additional stops can be easily added, and Google has a really neat feature which allows you to drag the suggested route to explore alternative routings. The total distance and estimated time is instantly calculated for each possible route.
In about five minutes this morning I put together this plan for our first week on the road. We’re eyeballing stops in Herkimer NY, Cazenovia NY, Limestone PA, Lagrange OH, and Jackson Center OH. No big towns on this trip! We might add in a visit to Corning NY to see the Corning Glass Museum again too, or maybe Letchworth State Park or Allegany State Park.

The plan is not finalized but I love how easy it is to play around with stops and routes using Google Maps. It allows me to get creative about our trip planning. With a list of cities for people we know (or want to meet), we can see who is within reasonable reach. Sometimes the most wonderful coincidences arise, bringing us to friends we didn’t think we’d see. That’s when technology really starts to make a difference.
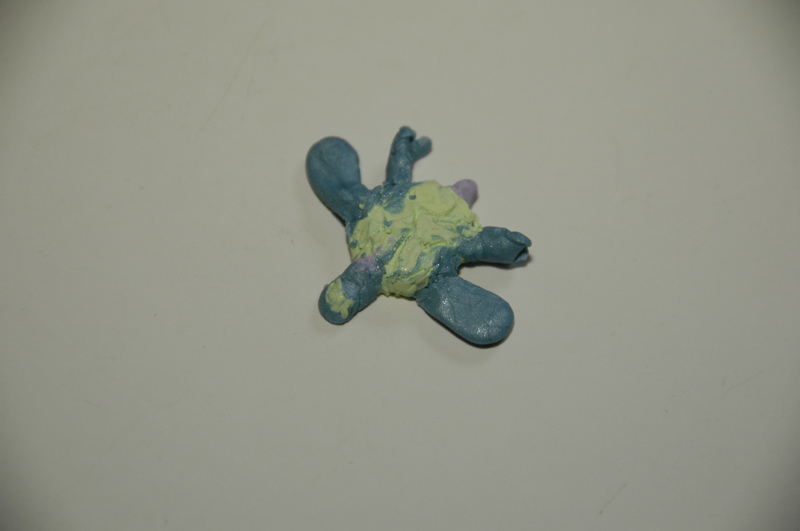
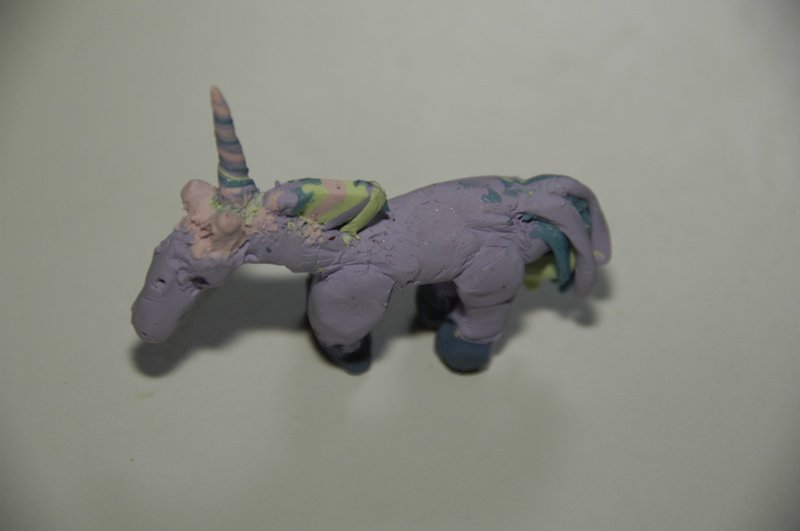
Speaking of creativity, I want to show you some of Emma’s recent artwork. She has recently been working with some polymer clay called Sculpey. I may just be another overly proud parent, or perhaps easily impressed because I am not competent at artistic things, but when I saw the miniatures she was creating (out of her own head, no books or pictures), I was blown away.


(Click for larger views.) These little figures are about 1″ long each (the unicorn is about 2 inches). They are intricately detailed with colors (like the striped horn on the unicorn), and textures that she applies with a toothpick. What freaks me out is that nobody told her what to make, or how to make it. She just got hold of this clay and starting making them. The middle one is an Orca whale splashing out of the water with a wave behind it. The action of it reminds me of a Remington bronze.
The things that come out of kids’ heads are amazing, in what they do and what they say. It’s the kind of creativity that adults often pooh-pooh when they see it, and then spend their adult lives trying to recapture. Anyone in a creative business could do well to think more like a kid. That includes me.
July 23, 2008 at 10:07 am · Filed under Uncategorized
I know that some of you are alarmed at the thought that I may have put away my ukulele. Fear not. I broke it out (briefly) to torture entertain friends at the Vintage Trailer Jam, and I still practice often. I hope to get to a point where people will actually invite me to come play it, as opposed to being politely tolerant when I force it on them.
The ukulele scene, as everyone knows, originates from Hawaii (where it was imported by Portuguese immigrants, believe it or not). On the west coast there are many active ukulele clubs and festivals, but as you head east the number of enthusiasts drops off rapidly, reaching a nadir somewhere around DeTour, MI. Even in Tucson we are on the eastern fringe of the ukulele action.
So you can understand that here in Vermont, where until recently pizza was considered “ethnic food,” ukuleles are hard to find and uke enthusiasts are even rarer. Thus I was extremely excited when Eleanor discovered that the father of one of our friends was a member of the honorable-sounding Vermont Ukulele Society, an organization I’d never heard of.
… with good reason. The VUS is a relatively recent gathering of six people, including a grade-school music teacher and leader, who meet every couple of weeks in a private home up in the tiny town of Lincoln VT. With me joining them on Monday night, we had seven people ranging from rank beginner to fairly advanced. Skill-wise, I was somewhere in the middle.
The whole point of the extravagantly-named VUS, as far as I can tell, is to have fun playing uke. Thus standards for admission to the group are reasonable: you must want to try to play ukulele. Knowledge of actual chords is optional at first; members will teach you as you go. If you don’t have a uke, you might be able to borrow one from a group member.
Obviously we’re not talking about really high standards for admission. The idea is to encourage new members, or as we in the Vermont Ukulele Society say, “bring in new converts.” (I think it was admirable that the founders named it a society rather than a cult. It shows some restraint.)
My induction was rather simple. We tuned up, handed out music, and sat down to play in the dining room. No dues, no rules, no member handbook, and no snacks. I was pleased to find that all of the songs were within my range, and thanks to assiduous home study, I knew nearly all the chords. It was a great experience, and a nice break from the endless slog of work and rain lately.
Having played adequately through exactly one rehearsal session, I was invited to join the Society for their second-ever “gig,” which is today. We are playing at a local restaurant at noon, to lighten up a local group’s annual lunch. Our public repertoire consists of playing and singing two songs in quick succession, after which we will sit down and hopefully not be asked for an encore. Not everyone in the group is entirely ready for this, but as our leader sensibly pointed out, “Nobody is expecting perfection. They’ll be amazed there even is a Ukulele Society.”
So there you have it: my first official public performance. I’d invite all of you but this is a private function. I’ll let you know when our album is available on iTunes.
July 22, 2008 at 9:06 pm · Filed under Mobile technology
On Monday I received a new piece of technology that I’ve long needed: a “mobile printer”. When we first started traveling full-time it seemed to me that all printers where mobile once you put them in a travel trailer. My HP 1022 laser printer has been “mobile” since I bought it in Springfield MO during the International Rally in 2005. But the trusty 1022, while on the small side for laser printers, is still fairly bulky, and it doesn’t fit in any of the trailer’s interior storage compartments. It has been riding across the country on the floor of the bedroom for three years, right where I can accidentally step on it as I get out of bed.
 After three years and 60,000+ miles of bouncing down the road, it now has a cracked paper tray and a few other bruises. More importantly, I’m tired of it taking up my floor space. I’m going to retire it to home-based use back in Tucson, and switch to the sexy new HP H470. It folds up into a very compact package that I can store almost anywhere, plus it has two huge advantages for people like me who work in a tiny space.
Number 1 is the fact that it can run off 12 volt power or an internal battery. I decided to go with the internal battery, so I can use it when we are boondocking. A big issue I’ve had with the 1022 laser printer is that it requires up to 300 watts of AC power when running, and being a fussy piece of electronics, it wants that power to be of the best quality, meaning a pure sine wave. It doesn’t like the square wave produced by most cheap inverters. To run it we’d either need a very expensive high-quality inverter with 300-watt capability.
Instead, an ink jet makes a lot more sense. Ink jets run on relatively little power so a battery is feasible, and they don’t mind cheezy square wave (misleadingly called “modified sine wave”) inverters. I’m going to run my ink jet on the rechargeable battery because it is more convenient than wiring up the power cable when I want to print a single page.
Number 2 advantage is that the HP H470 has wireless capability. That makes it really easy to use. I’ll just take it out of the padded sleeve (which Eleanor is going to make for me), drop it on the bed and insert some paper. Voila — ready to print. No cables to the power or to my computer. Wireless is always good in a small space, especially since I often have to work on the bed or from outside. It’s also nice for Eleanor, since we can now both use the printer at the same time from different locations in or around the trailer.
Next entries »
 I soloed today. Eleanor wasn’t available for more than an hour due to things on her schedule. Fortunately at this point I’ve figured out how to set up large pieces for cutting by myself, so the need for someone to hold the end of the board was minimal. Despite working alone I managed to make pretty good progress: another closet door (a tricky job due to its length), a dinette end, a half-height bulkhead that goes next to the refrigerator, two sliding doors, two under-dinette doors, and several “mystery pieces.” That’s one of them in the photo, sitting next to the ratty old part it replaces.
 At this point almost every piece is done except the two overhead compartments, and a few pieces of the interior that didn’t make it back to here. I’m going to store the overhead compartments and the remaining plywood to re-build them, and bring all the completed parts to Plattsburgh for re-installation. As I write this, the final two glue-ups are setting on the workbench. In the photo you can also see a large bulkhead off to the right. Every other completed part is loaded in the Armada.